


Spring is the season when eggs come back into their own. Easter is just days away, markets are stacked with free-range and barn eggs from farms waking up after winter, and kitchens across the UK are cracking shells at pace—for hot cross bun glazes, simnel cake custards, fresh pasta, and the kind of weekend omelettes that deserve a proper technique. Yet for most home cooks, cracking an egg remains a two-handed, bowl-tapping, shell-fishing affair. Professional chefs do it differently: one hand, one motion, no mess, no shell in the bowl.
This article breaks down exactly how that single-handed crack works, why it produces a cleaner break than the bowl-edge method, and what you can start practising today to make it second nature. The technique itself takes minutes to understand and a few dozen eggs to master—fortunately, spring gives you plenty of reasons to crack a few.
Why the one-handed crack matters
The question is not purely about showmanship. A clean one-handed egg crack is faster, more hygienic, and produces fewer shell fragments than the method most of us learned at home. When a chef cracks fifty eggs in a morning service—for hollandaise, scrambled eggs, Yorkshire pudding batter, or a pastry cream—every second and every shard of shell counts.
The conventional method involves tapping the egg against the rim of a bowl. That sharp, concave edge creates a jagged fracture that often drives shell inward and into the white. The professional approach uses a flat, controlled impact—the back of a knife, the rim of a pan, or the edge of a work surface—which produces a cleaner, more deliberate crack across the equator of the shell. Combined with one-handed splitting, it keeps the other hand free to hold a whisk, a pan handle, or the next egg in the sequence.
The anatomy of an egg shell
Understanding why the technique works starts with the shell itself. A hen's egg is not uniformly fragile: the shell is strongest at the poles—the pointed tip and the rounded base—and relatively weaker along the middle band, its equator. This is why a firm tap to the side of the egg, rather than at either end, produces the most controlled fracture. The membrane just inside the shell also plays a role: intact, it holds the halves together after the crack, giving you a split second to reposition your fingers before the white escapes.
The shell is also porous and carries bacteria on its surface. Every time the shell makes contact with the inside of a bowl—as it does with the bowl-rim method—there is a small risk of cross-contamination. Cracking against a flat surface, away from the bowl, and dropping the contents cleanly is both safer and cleaner.
Step-by-step: the professional one-handed crack
1. Grip the egg correctly
Hold the egg lengthways in your dominant hand: the narrow tip resting lightly against your palm, the rounded base towards your fingertips. Your thumb sits on one side of the egg, your index and middle fingers on the other, your ring finger providing support underneath. The grip should feel firm but not tight—you are not squeezing, you are controlling. Most people instinctively grip too close to the top or bottom; find the true middle of the shell and position your fingers there.
2. Deliver a single, confident tap
Strike the middle of the egg against the edge of a flat, hard surface—the flat back of a chef's knife blade laid against the worktop, the edge of a thick chopping board, or the lip of a heavy-bottomed pan. The key word is confident: a hesitant half-tap produces a shallow dent that splits badly. A single firm tap produces a clean, roughly horizontal crack that crosses the equator. You are aiming for a fracture line of about 3–4 cm, no deeper than the shell itself.
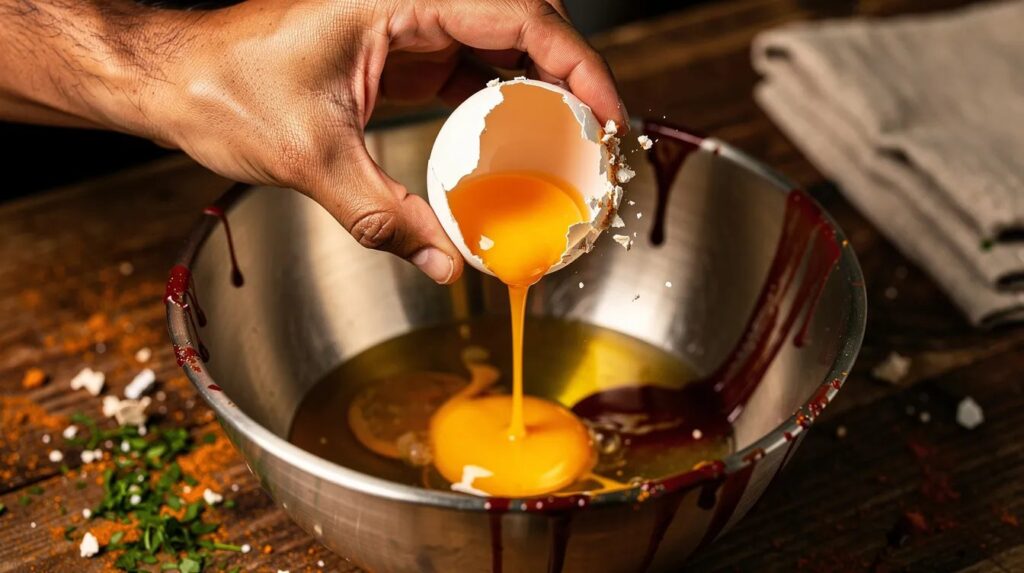
3. Split with one hand
This is the step that separates the technique from everything else. Immediately after the tap, without moving the egg far, use the same hand to split it open. Your thumb pushes inward and slightly downward along the crack; your index and middle fingers draw the upper half of the shell backward and upward. The motion is a small, decisive outward rotation—less than you think. Let gravity and the membrane do the work: the contents drop cleanly into the bowl or pan below.
Your thumb is the key. It is the lever. Press it into the crack—not through the membrane, but into the shell gap—and the two halves will follow the direction of your fingers. With practice, the whole sequence from tap to drop takes under a second.
4. Check and clear
After dropping the contents, glance at the inside of the shell halves. If a shard has remained stuck to the membrane, remove it now before it reaches the bowl. If a fragment has made it into the bowl, use one of the empty shell halves to fish it out—shell attracts shell far more effectively than a wet fingertip.
Why chefs use a flat surface, not the bowl edge
The bowl-edge method drives the shell inward because the curved rim creates an inward-pointing fracture. A flat surface creates a crack that runs parallel to the shell's surface—outward pressure rather than inward collapse. This is also why some chefs prefer the back of a knife: the flat spine gives a linear contact point across the equator, producing an almost surgical split.
A second reason is speed: when cracking multiple eggs into a common bowl, the flat surface allows the cook to work over a separate container first, then add the egg to the main mix. Any shell that falls stays isolated; any bad egg (a rare event, but it happens) never contaminates the larger batch.
Common mistakes and how to fix them
The first mistake is tapping too gently, then compensating with a second, harder tap. That double-tap produces an unpredictable fracture and sends fragments inward. Commit to a single, measured strike. The second mistake is positioning the fingers too close to one end, which means one half of the shell is much larger than the other and the split is uneven. Find the equator. The third mistake is hesitating between the tap and the split—the membrane relaxes in under a second and the egg will begin to move on its own terms. Act immediately after the tap.
Practice on room-temperature eggs: the membrane is slightly more relaxed and the contents less prone to breaking the yolk on impact. Cold eggs straight from the fridge have a tighter membrane and a firmer yolk, which is useful once the technique is established but less forgiving for beginners.
The chef's astuce
Crack eggs over a small ramekin or cup first, never directly into your main preparation. This habit—standard in professional kitchens—means a shell fragment or an off-smelling egg never ruins a hollandaise or a cake batter you have spent twenty minutes building. In spring, when you are cracking fresh farm eggs whose shells may be thinner and more irregular than supermarket eggs, the ramekin rule is particularly worth keeping.
When to use the technique
The one-handed crack becomes genuinely useful any time the other hand is occupied: holding a hot pan while you drop an egg directly into it, whisking a sauce with one hand while cracking the next egg with the other, or working at pace when preparing a large batch of scrambled eggs or a hollandaise for a crowd. At Easter, when British kitchens tend to be cracking eggs in unusual quantities—for simnel cake, pavlova, lemon curd, or simply a long run of boiled eggs—the efficiency of the technique starts to feel worthwhile rather than theatrical.
It is also a question of control. A cook who can crack an egg cleanly with one hand has a more precise relationship with their ingredients—they understand the structure of what they are breaking, they act with intention rather than reflex, and they waste less. That precision extends to everything else on the worktop.
A brief history of the technique
The one-handed egg crack has been a mark of kitchen competence for as long as professional brigade kitchens have existed. In the classical French tradition codified by Auguste Escoffier in the late nineteenth century, speed and cleanliness at the stove were non-negotiable: a commis who fumbled with an egg or fished for shell fragments was slowing down a chain of production. The technique was not taught formally so much as absorbed through repetition under the pressure of service.
In British culinary training, the one-handed crack appears in City & Guilds examinations and professional cookery apprenticeships as a basic demonstration of knife-and-hand skills. It is less about the dramatic gesture—though that is part of its appeal on television—and more about building the hand memory that underlies every other precision task in the kitchen.
Frequently asked questions
How long does it take to learn the one-handed egg crack?
Most people find the motion starts to feel natural after cracking twenty to thirty eggs with deliberate focus. A useful approach is to dedicate one cooking session to the technique—make a large batch of scrambled eggs, a frittata, or a round of pancakes, and practise on every single egg. Within a week of regular cooking, the motion becomes automatic.
Does the technique work on all egg sizes?
The principle works across all sizes, from small hens' eggs to large free-range eggs. Very large eggs may require a slightly firmer tap because the shell is proportionally thicker. Quail eggs, which are much smaller and have a harder shell, typically require a serrated knife to score the shell first before splitting—the one-handed method does not transfer directly to them.
What is the best surface to crack against?
A thick wooden chopping board or the flat back of a chef's knife held against a flat surface both work well. Avoid cracking against the rim of a ceramic bowl or a thin glass—these create inward-pointing fractures and, occasionally, chip the bowl. A heavy-bottomed pan's rim is acceptable but the angle makes it harder to keep the crack horizontal.
Why do shell fragments end up in the bowl even with this technique?
Shell fragments usually enter the bowl either because the tap was too hard and drove a shard through the membrane, or because the split was too slow and the membrane tore unevenly. Work on keeping the tap firm but not violent, and on splitting immediately after impact. Cracking over a ramekin first, rather than directly into the preparation, gives you a chance to spot and remove any fragment before it causes a problem.
Is one hand better than the other for this technique?
The dominant hand is almost always preferable for learning, since the fine motor control required for the split comes more naturally. Left-handed cooks use exactly the same technique, simply mirrored. Once the technique is established in the dominant hand, some professional cooks train the non-dominant hand as well, allowing them to crack two eggs simultaneously—useful in high-volume service, though by no means necessary for home cooking.