

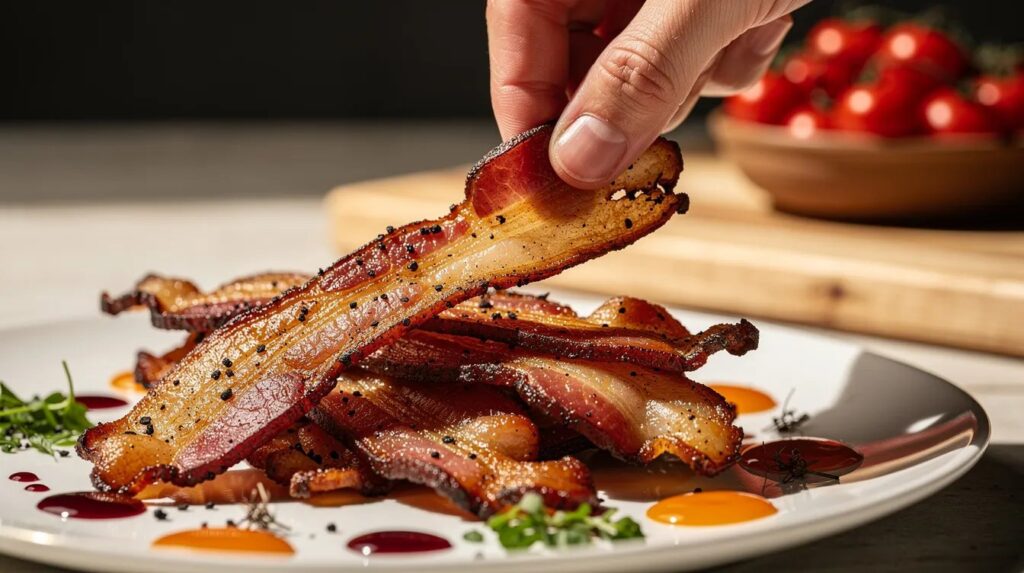
There is a particular pleasure to bacon done properly — that sharp sizzle as the rashers hit the pan, the way the kitchen fills with that unmistakable smoky warmth. And yet, for all the times we have cooked it, the result can be unpredictable: edges that curl and char before the centre has rendered down, strips that turn chewy rather than crisp, fat that spatters across the hob and leaves the bacon somewhere between steamed and fried. With spring arriving and the mornings still carrying a chill, a proper cooked breakfast feels more than justified — and it deserves to be done right.
The fix turns out to be sitting in the back of the cupboard: a light dusting of plain flour, applied before the bacon ever touches the pan. It sounds almost too simple to be real, but the science behind it is solid and the results are consistent. The flour creates a thin, dry coating that absorbs surface moisture, encourages even browning through the Maillard reaction, and gives the finished rasher a genuinely crisp exterior without drying out the meat beneath. This is the technique that makes the difference — and once you understand why it works, you will not cook bacon any other way.
| Preparation | 3 min |
| Cooking | 6–8 min |
| Portions | 2 people |
| Difficulty | Easy |
| Cost | £ |
| Season | Year-round · particularly satisfying in early spring |
Ingredients
- 6 rashers smoked back bacon or streaky bacon, whichever you prefer
- 2 level tablespoons plain flour (all-purpose)
- A pinch of fine sea salt
- A pinch of freshly ground black pepper (optional)
- ½ teaspoon neutral oil (vegetable or sunflower) — only if using a pan with less natural fat
Utensils
- Heavy-based frying pan or cast iron skillet
- Shallow plate or tray for dusting
- Kitchen tongs
- Wire rack or plate lined with kitchen paper
- Pastry brush or clean hands for even coating
Preparation
1. Prepare the flour coating
Spread the plain flour across a shallow plate in an even layer. Season it lightly with salt and, if you like a faint warmth, a small amount of black pepper. Keep the quantity restrained — you are not making a batter or a thick crust. The goal is the thinnest possible veil of dry flour, no more than you might use to dust a worktop before rolling pastry. Too much and the coating will clump in the pan rather than crisping cleanly; too little and there is no point. The right amount leaves a faint white bloom on the rasher that almost disappears on contact with the heat.
2. Dry and coat the bacon
Pat each rasher dry with a piece of kitchen paper. This step matters: surface moisture is the enemy of crispness, and the flour works far more effectively on a dry surface. Lay each rasher into the flour, pressing lightly so the coating adheres, then turn it over and repeat on the other side. Shake off any excess — hold the rasher up and give it a gentle tap. What remains should be barely visible: a thin, powdery layer clinging evenly to the surface of the meat and fat. Set the coated rashers onto a clean plate while you heat the pan.
3. Heat the pan correctly
Place your heavy-based pan over a medium heat and allow it to warm for a full two minutes before adding anything. A cold pan is the most common reason bacon ends up soft — the meat begins to release moisture before the surface temperature is high enough to drive off that moisture as steam. If you are using streaky bacon, the fat content is sufficient to cook without added oil. For leaner back bacon, add just a drop of neutral oil and tilt the pan so it coats the surface evenly. The pan is ready when a small pinch of flour dropped in turns golden within five seconds.
4. Cook the bacon — and resist the urge to move it
Lay the floured rashers flat in the pan, leaving a small gap between each one. You will hear an immediate, confident sizzle — this is the sound of the flour coating beginning to set, forming a dry crust before the meat beneath has had a chance to tighten and curl. Leave the rashers entirely undisturbed for 2–3 minutes. Resist every instinct to lift or shuffle them. The underside needs sustained, even contact with the pan to develop the golden, crisp layer that makes this technique worth using. When the edges of the rashers begin to turn opaque and the colour crawling up from the bottom is a deep amber rather than pale beige, they are ready to turn.
5. Turn once, finish, and rest
Using tongs, turn each rasher in one clean movement. The coated surface should release from the pan without sticking — a good sign that the crust has formed properly. Cook the second side for a further 2–3 minutes, adjusting the heat slightly downward if the flour is colouring too fast. Both sides should be an even, burnished golden brown. Transfer the finished rashers to a wire rack rather than directly onto kitchen paper; a rack allows air to circulate beneath and prevents the underside from softening in its own steam. Wait a full minute before serving — the crust sets as it cools slightly, and that final rest is where the true crispness locks in.
My chef's tip
The flour technique works across the full spectrum of bacon cuts, but it is particularly transformative with streaky rashers, where the high fat content can otherwise lead to uneven rendering. For an extra dimension of flavour, try replacing a teaspoon of the plain flour with smoked paprika or a tiny amount of mustard powder — neither will overpower the bacon, but both deepen the savoury note of the crust. In spring, when good-quality outdoor-reared bacon becomes more widely available at farm shops and farmers' markets, the difference in flavour between that and a supermarket basic is substantial. The flour works with both, but the quality of the starting ingredient still shows through.
What to serve it with
Flour-crisped bacon holds its texture far longer than conventionally cooked rashers, which makes it particularly well suited to anything where the bacon risks going soft — sandwiches, salads, or eggs Benedict where it sits beneath a warm hollandaise. The crisp coating also provides a textural counterpoint to soft, scrambled eggs or a thick slice of buttered sourdough toast. For a spring-appropriate pairing, try the bacon alongside poached eggs and a handful of wilted watercress dressed with a little cider vinegar: the peppery bite of the watercress and the acidity of the vinegar cut through the richness of the fat cleanly.
The science behind the technique
The reason this works comes down to two distinct but complementary processes. The first is moisture absorption: flour is hygroscopic, meaning it draws water from the surface of the bacon, removing the thin film of moisture that would otherwise create steam and delay browning. The second is the Maillard reaction — the chemical process responsible for the golden-brown colour and complex savoury flavour that develops when proteins and sugars are exposed to high heat. Flour, which contains starch and a small amount of protein, undergoes this reaction rapidly and efficiently, kickstarting the browning process and ensuring it happens evenly across the entire surface of the rasher rather than in patches.
The same principle underpins why chefs dust scallops, liver, or thin cuts of chicken in flour before pan-frying them. The coating acts as a buffer between the meat and the pan, regulating the transfer of heat and creating a consistent crust. With bacon, the technique is even more forgiving, because the fat rendering from the rasher itself provides the cooking medium — you are, in effect, shallow-frying the bacon in its own rendered lard, with the flour coating acting as the vehicle for crispness. It is a closed, self-sufficient system, and it produces a result that is difficult to achieve by any other method at home.
Nutritional values (per serving of 3 rashers, approximate values)
| Nutrient | Amount |
|---|---|
| Calories | ~280 kcal |
| Protein | ~22 g |
| Carbohydrates | ~6 g |
| of which sugars | ~0.2 g |
| Fat | ~18 g |
| of which saturates | ~6 g |
| Fibre | ~0.2 g |
| Salt | ~2.1 g |
Frequently asked questions
Does the flour make the bacon taste different?
Not in a way that is perceptible as "floury." The quantity used is small enough that it fuses with the surface of the bacon during cooking and takes on the flavour of the rendered fat and the Maillard browning rather than tasting of raw flour. What you notice instead is a more pronounced savoury depth and a crust that carries the smokiness of the bacon more intensely than an uncoated rasher would.
Can I use a different type of flour?
Plain (all-purpose) flour gives the cleanest result, but rice flour is an excellent alternative for a slightly lighter, even crisper finish — it is the coating of choice in Japanese karaage technique and behaves similarly here. Self-raising flour will work in a pinch but the raising agents can cause the crust to puff slightly and then collapse. Avoid wholemeal or heavily milled flours, as the bran particles can burn before the bacon is fully cooked.
Will this work in an air fryer?
Yes, with a small adjustment. The circulating hot air in an air fryer can cause the loose flour to blow off the surface before it sets. Press the coating on firmly and allow the floured rashers to rest on a plate for two minutes before placing them in the basket — this gives the surface moisture time to absorb into the flour and helps it adhere. Cook at 200°C for 6–8 minutes, turning halfway through.
Does the quality of the bacon make a significant difference?
Substantially. Higher-welfare, dry-cured bacon contains less added water than budget equivalents, which means the flour coating has less work to do and the finished texture is more consistent. Wet-cured bacon — recognisable by the white liquid that leaches into the pan during cooking — can be used with this technique, but you may need to increase the quantity of flour slightly and accept that the first turn will release more steam. Either way, the floured method outperforms the uncoated version of the same rasher.
Can the floured bacon be cooked ahead and reheated?
The bacon can be cooked up to two hours in advance and held on a wire rack at room temperature without losing much of its texture. For longer storage, refrigerate the cooked rashers between layers of baking paper and reheat them in a dry frying pan over a medium-high heat for 90 seconds per side, or in an oven at 180°C for four minutes. Microwaving is not recommended — the steam it generates will soften the crust rapidly and undo most of the work.
Here's why this technique is worthwhile: flour-crisped bacon will transform your cooking.