
March arrives with that particular restlessness in the kitchen — longer evenings still carry a chill, yet something in the air quietly signals that the heavy stews of winter are losing their appeal. What the table calls for now is something satisfying but lighter, quick to pull together after work, and substantial enough to silence a hungry family without fuss. These one-pan chicken bites answer precisely that: golden, crisped edges, a sticky-savoury glaze, and a texture that holds its own whether served straight from the pan or plated alongside early spring greens.
The beauty of this recipe lies in its restraint. One pan. One session of washing-up. A handful of storecupboard ingredients and free-range chicken thighs, which at this time of year remain excellent value and far more forgiving than breast meat during high-heat cooking. The technique is straightforward, but a few deliberate steps — the right pan temperature, resting the meat, building the sauce from the fond — elevate the result well beyond weeknight ordinary. Apron on, hob on.
| Preparation | 15 min |
| Cooking | 25 min |
| Serves | 4 people |
| Difficulty | Easy |
| Cost | ££ |
| Season | Early spring — pairs well with tenderstem broccoli, new-season garlic, baby spinach |
Suitable for: Gluten-free (check soy sauce label) · High-protein · Dairy-free
Ingredients
- 700 g boneless, skinless chicken thighs, cut into 4 cm pieces (free-range where possible)
- 2 tbsp rapeseed oil (or sunflower oil)
- 1 tsp fine sea salt
- ½ tsp freshly ground black pepper
- 1 tsp smoked paprika
- ½ tsp garlic powder
- 3 cloves fresh garlic, thinly sliced
- 2 tbsp tamari or soy sauce (tamari for gluten-free)
- 1 tbsp runny honey
- 1 tbsp wholegrain mustard
- 100 ml good-quality chicken stock
- 1 tsp apple cider vinegar
- Small handful of fresh flat-leaf parsley, roughly chopped, to finish
- Zest of ½ unwaxed lemon
Utensils
- Large, heavy-based frying pan or sauté pan (28–30 cm, stainless steel or cast iron recommended)
- Sharp chef's knife and chopping board
- Tongs
- Small bowl for the sauce mixture
- Wooden spoon or silicone spatula
- Kitchen paper
Preparation
1. Prepare and season the chicken
Remove the chicken thighs from the fridge at least 15 minutes before cooking — bringing meat closer to room temperature helps it cook more evenly and reduces the risk of a steamed, pale exterior. Pat each piece thoroughly dry with kitchen paper; moisture is the enemy of a proper sear. Cut the thighs into roughly 4 cm pieces, aiming for consistency so each bite finishes cooking at the same time.
In a bowl, toss the chicken pieces with the sea salt, black pepper, smoked paprika and garlic powder until every surface is coated. This dry seasoning layer does two things: it flavours the meat directly, and the paprika helps accelerate the Maillard reaction — the chemical process responsible for that deep amber-brown crust that carries so much flavour. Set aside while you prepare the sauce.
2. Mix the sauce
In a small bowl, whisk together the tamari, runny honey, wholegrain mustard, chicken stock and apple cider vinegar. The combination sounds assertive on paper but behaves with more balance in the pan: the honey rounds off the salt of the tamari, the mustard adds body without heat, and the vinegar keeps the sauce lively rather than cloying. Set the bowl close to the hob — once the chicken is seared, the sauce goes in quickly.
3. Sear the chicken bites
Heat the frying pan over a high heat for at least 2 minutes before adding any oil — a properly preheated pan is the single most reliable guarantee of a good crust. Add the rapeseed oil and swirl to coat. When the oil begins to shimmer and the first wisps of smoke appear, lay the chicken pieces in the pan in a single layer, working in two batches if necessary. Overcrowding the pan drops the temperature sharply, causing the meat to release moisture and braise rather than sear.
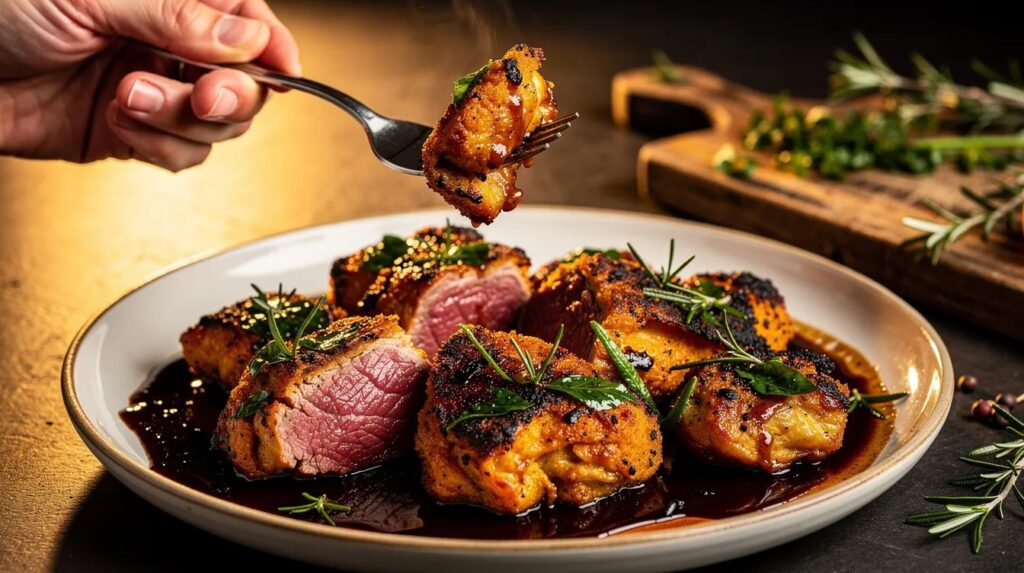
Leave the pieces undisturbed for 3–4 minutes. Resist the urge to move them; the chicken will release naturally from the pan when a proper crust has formed. Flip with tongs and cook for a further 2–3 minutes on the second side. The pieces should be a deep, burnished brown — not golden, brown. Transfer to a plate and repeat with any remaining chicken.
4. Build the sauce from the fond
With the pan still over a medium-high heat, add the sliced fresh garlic. It will cook quickly in the residual fat — 30 to 45 seconds, stirring constantly, until fragrant and just beginning to colour at the edges. Do not let it darken further; bitter garlic cannot be corrected.
Pour in the sauce mixture. It will sizzle and bubble immediately, and you will notice the brown residue on the base of the pan beginning to dissolve into the liquid — this is the fond, and it is where the concentrated flavour of the sear lives. Use the wooden spoon to scrape the base of the pan, incorporating every bit of it. Let the sauce reduce for 2–3 minutes, stirring occasionally, until it thickens enough to coat the back of a spoon.
5. Return the chicken and finish
Add the seared chicken pieces back into the pan, along with any resting juices that have collected on the plate — these juices contain dissolved proteins and should not be discarded. Toss to coat every piece thoroughly in the glaze. Cook for a further 3–4 minutes over a medium heat, turning occasionally, until the sauce clings and the chicken is fully cooked through. The internal temperature should reach 75°C at the thickest point.
Remove from the heat. Scatter over the lemon zest and roughly chopped parsley. The zest cuts through the richness of the glaze and lifts the whole dish, adding brightness without acidity. Serve immediately, straight from the pan.
Chef's tip
The pan temperature at step three is non-negotiable. If you are unsure whether the pan is hot enough, drop a single piece of chicken into it: you should hear an immediate, loud sizzle. If the sound is quiet or delayed, remove the piece and give the pan another minute. This single habit — waiting for the right heat — accounts for more of the final result than any other step in the recipe. In spring, a handful of sliced spring onions added with the garlic works beautifully, adding a gentle sweetness and a flash of colour that suits the season.
Food and drink pairings
The glaze carries savoury depth from the tamari, a gentle sweetness from the honey, and a faint acidity from the mustard and vinegar. What works alongside it needs to either mirror that complexity or provide a clean contrast.
A lightly chilled Pinot Noir from Burgundy or a New Zealand Pinot Noir — with its notes of red cherry, dried herbs and a subtle earthiness — handles the umami of tamari without competing. For a white wine option, an off-dry Alsatian Riesling has the structure and residual fruit to stand up to the honey glaze. Without alcohol, a sparkling elderflower pressé with a squeeze of lemon provides a similarly refreshing counterpoint to the richness of the pan sauce.
About this dish
One-pan chicken recipes have roots across almost every culinary tradition — from the French poulet sauté to Chinese wok-fried chicken with aromatics, the principle of searing meat, building a sauce from the same vessel, and finishing everything together is one of the oldest and most efficient cooking methods in the domestic kitchen. The version here draws on that cross-cultural logic, combining a British storecupboard approach with East Asian seasoning notes in a way that has become increasingly common in everyday British home cooking over the past two decades.
Chicken thighs, long considered a secondary cut in the UK, have quietly reasserted themselves as the more flavourful choice for high-heat cooking. Their higher fat content keeps them moist under intense heat where breast meat would dry out, and their connective tissue melts into any sauce with which they are cooked, adding body. The cut is also considerably more economical — typically half the price per kilogram of breast meat — making it a practical choice as spring ingredients begin to come back into the markets.
Nutritional values (per serving, approximate values)
| Nutrient | Amount |
|---|---|
| Calories | ~320 kcal |
| Protein | ~38 g |
| Carbohydrates | ~9 g |
| of which sugars | ~7 g |
| Fat | ~14 g |
| Fibre | ~0.5 g |
Frequently asked questions
Can this be prepared in advance?
The chicken bites can be seared up to 24 hours ahead and refrigerated, covered, without the sauce. When ready to serve, make the sauce fresh in the same pan, return the chicken, and finish as directed — this will take only 6–8 minutes from fridge to table. The texture may be marginally less crisp than freshly seared, but the flavour remains very good. Avoid making the full recipe in advance and reheating, as the glaze can tighten and turn sticky rather than glossy.
How should leftovers be stored?
Allow the chicken to cool completely before transferring to an airtight container. Refrigerate for up to 3 days. Reheat gently in a covered pan over a low heat with a splash of water or stock to loosen the glaze. Avoid microwaving at high power, which can tighten the chicken and cause the sauce to separate. Leftovers work well sliced cold over a salad with new-season leaves — particularly sharp watercress or baby spinach.
What substitutions or variations are possible?
Bone-in thighs work with this recipe but require an additional 10–12 minutes of cooking time; finish them in a 180°C oven after searing if using bone-in. For a spicier profile, add ½ tsp dried chilli flakes with the garlic. In spring, young leeks or spring onions can replace or accompany the garlic. Maple syrup makes a good substitute for honey if that is what is to hand, with a slightly more pronounced sweetness. For a completely different character, swap the tamari and mustard for a tablespoon of harissa and a teaspoon of tomato purée.
Can the recipe be scaled up for a larger group?
Yes, though the key constraint is pan size. For 6–8 people, it is more reliable to sear in the same pan in multiple batches — all the chicken — then transfer everything to a large, wide roasting tin, pour the sauce over, and finish in a 190°C oven for 12–15 minutes. This avoids the need for a catering-sized hob pan and actually produces a very even result, as the oven heat surrounds the chicken from all sides.
What is the best pan to use?
A heavy stainless steel or cast iron pan gives the best sear and builds the most flavourful fond. Non-stick pans can be used but will produce a lighter crust and a less rich sauce base, as the non-stick coating discourages the deep browning that creates the fond. If using non-stick, increase the heat slightly and extend the searing time by 1–2 minutes per side. Whatever the pan, it must be large enough that the chicken sits in a single layer during searing — this is the one condition on which the recipe's success most depends.